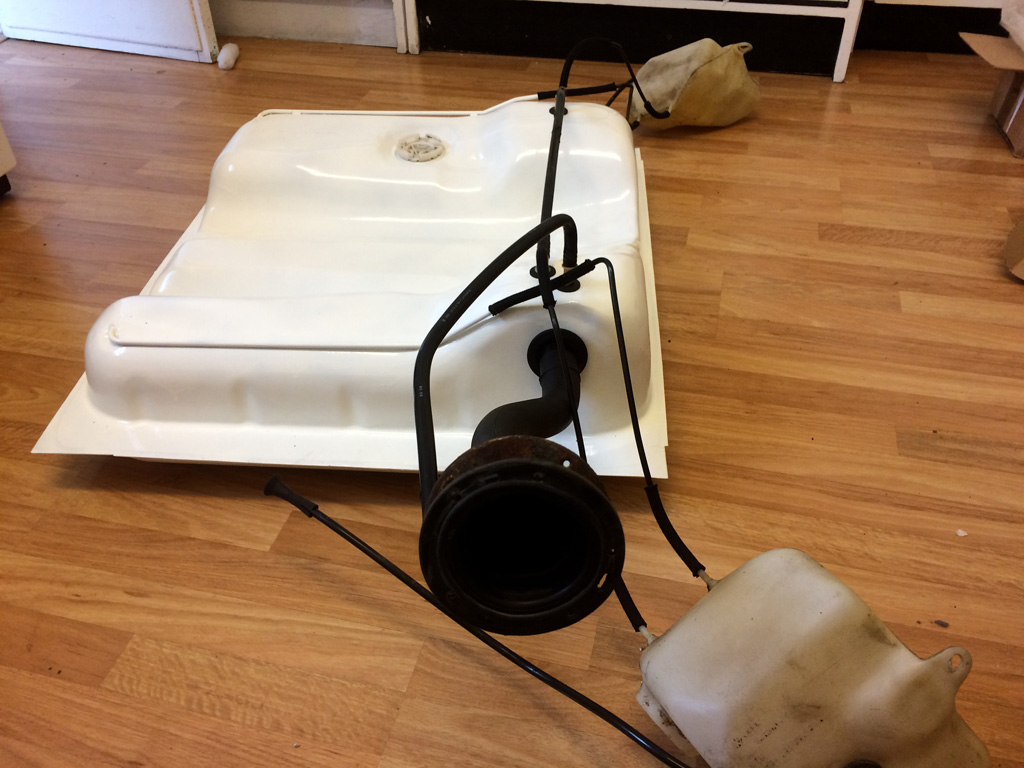
The task this week was to replace the Fuel Lines, however when inspecting the tank I found a lot of rust so a new one was purchased from Brickwerks.
I followed the directions in the Club 80-90 Wiki entry Fuel System tank removal.
Draining the Tank
First I disconnected the battery by taking off the earth lead, made sure the handbrake was on, put the van in gear and chocked the wheels.
I then jacked up the Nearside to allow the tank to drain on the fuel filter side (Offside). I used a 3 tonne bottle jack and hardwood blocks.
Next I removed the filler cap and cut the Offside fuel line just after the fuel filter. I angled a 20L container underneath the van and cut the fuel line with scissors. The tank drained slowly, it took around 15 minutes till empty.
When the tank was dry I jacked up the Offside so i’d have as much room as possible underneath when I drop the tank.


Filler Pipe
With the filler cap removed you can access the three screws securing the retainer plate, I undid these and poked the rubber neck through the hole.
The Filler Pipe has an secondary breather pipe attached, pull this off and you can remove the pipe out from under the wheel arch. Keep twisting while you do this, the pipe will pop out of the fuel tank and come free.


Breather Tanks
There are tanks situated under the wheel arches on both sides which act as expansion volume when filling the main fuel tank. In combination with the breather balance pipe they work to allow fuel to reach the top of both sides (the fuel tank has a divot).
Twist off or cut the breather pipes to the tanks, mine were already split so very easy to remove.


It is not necessary to remove the tanks, I did so to check the top seals and treat any rust behind.
To do so: There is one 13mm bolt holding the Breather Tank in place. Even when removed the tank was impossible to get off. This is due to 25 years of dirt trapped between the tank and body creating an unintentional seal. I used a large flat head screwdriver to jab all the dirt out then levered hard downwards. Eventually the tanks popped off.
Tank Straps
There are two straps that hold the fuel tank in place. They are secured with a 13mm bolt towards the front of the van and a flap with angled edges at the other. Undoing the bolts will cause the tank to drop slightly, there is a ridge at the front that stops it coming all the way down. The angled edges needed bending back with pliers before I was able to slide the straps out.


Once the straps were removed the tank will drop further down. Undo the connection to the Fuel Gauge Sensor and pull down, the Breather Balance Pipe will pop out allowing the tank to come completely free. As I was replacing the tank I didn’t worry about it getting damaged coming down, it wasn’t overly heavy so was done by hand. If you’re keeping the tank maybe use a jack or some sort of padding when you do the drop.
The Breather Balance Pipe is secured to the van with a small bracket, unscrew this and pull the pipe free of the van.


The Fuel Gauge Sensor is removed from the tank by twisting anti-clockwise and pulling free. I used a long flat head screwdriver as a lever. Mine had considerable accumulated dirt which needed cleaning off first.
I also removed the four strips of rubber padding on both sides of the tank to re-use on my new fuel tank. I bought new breather and filler grommets, you could however reuse the ones from your old tank if in good condition.


Painting the New Fuel Tank
The new tank from Brickwerks came primered ready to paint. I chose to first do a coat of Bilt Hamber Electrox and a topcoat of Rustoleum CombiColor for the ultimate rust protection. I went a bit overboard with my spray can of CombiColor, using it all up on the top of the tank. Luckily I had a tin as well so rollered the bottom (2 coats with 20% white spirit added to thin).


Breather Pipes
I laid all the pipes out and cut new lengths of 5.5mm Overbraid Fuel Hose (1 metre was enough).
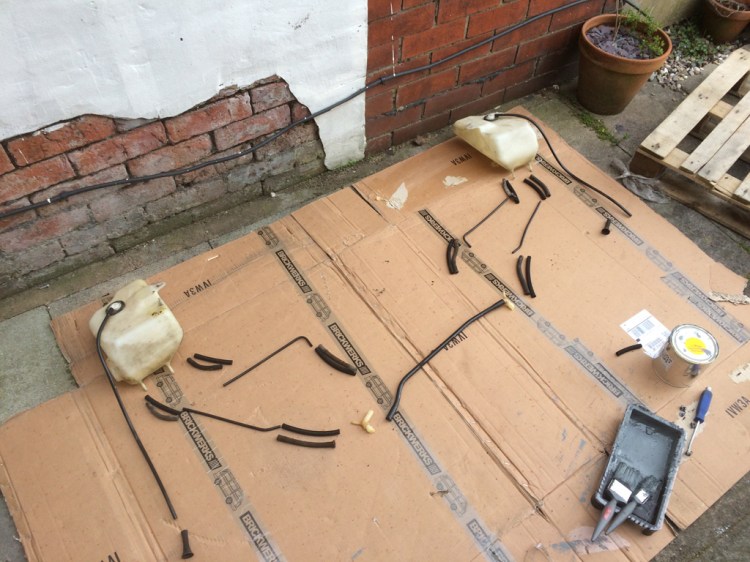
The pictures below show how the breather tanks and filler neck connect to the Fuel Tank:


Refitting the Fuel Tank
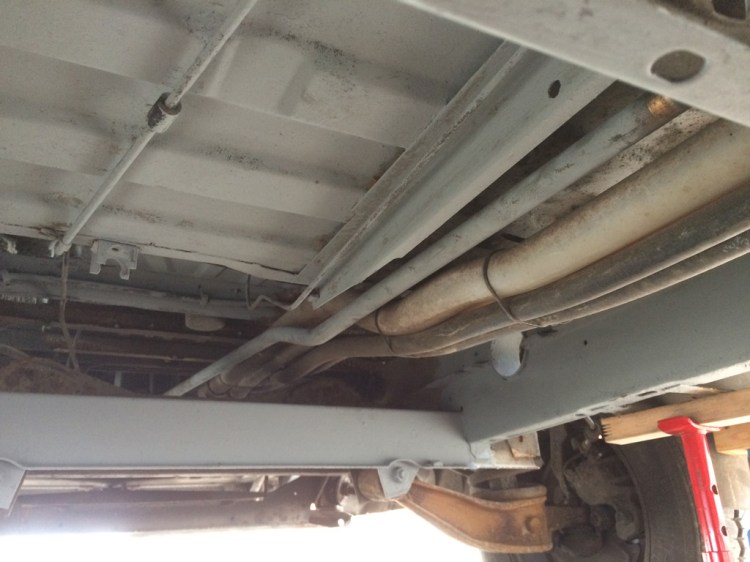
With the tank out I could inspect the chassis, clutch pipe and handbrake cable. There was some surface rust (nothing too serious) which I wire brushed and coated in Electrox.
To refit the tank I first secured the Breather Balance Pipe to the chassis and fed the hoses through to the wheel arches. The pipe has a kink in it which should be fitted the left side as the tank is lower on this side. Reconnect the Fuel Gauge Sensor here as well.


I then positioned the tank on the front lip, pushed the rear upwards and slid the tank straps into place. The tank is secure on the lip and tank straps so won’t drop down. I then pushed a tank strap upwards and secured the 13mm bolt before doing the next.
There is space to reach through the wheel arch (removing the wheel gives more room) and push the breather pipes down into the top of the tank grommets. Although you won’t be able to see it, this is what it looks like:

In the image above you will notice the pipe in the top left corner coming through the chassis. This is from the top of the Breather Tank and should have a “trumpet” or “Shrek ear” attached. (I knocked mine off fitting the tank).
The Fuel Filler Breather pipe was pushed into the remaining tank grommet before going to the next step.
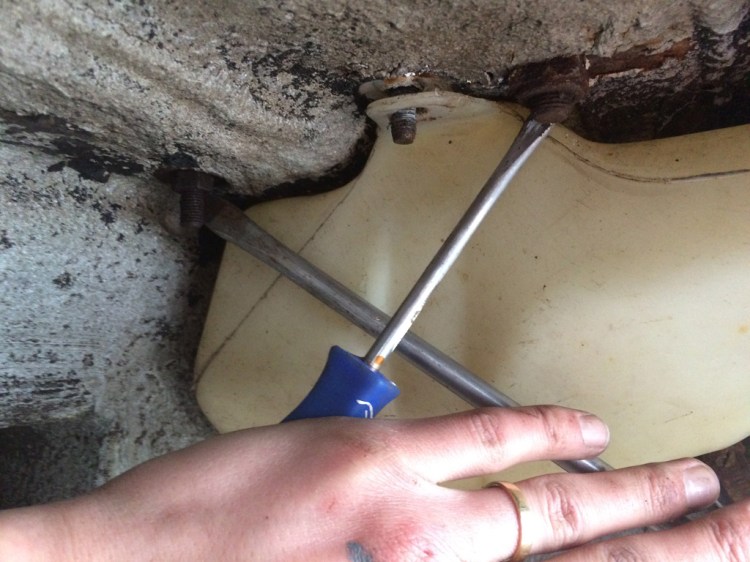
Refitting the Breather Tanks
The Breather Tanks are nearly as hard to get back in as they were to remove. I devised a cross screwdriver technique to lever the tanks back into place under the wheel arches:
The hoses you poked into the wheel arch can now be reconnected to the bottom of the Breather Tanks.
Refitting the Fuel Filler Pipe
The Fuel Filler Neck Ring was a rusty mess so needed replacing, luckily Brickwerks do a very nice Stainless Steel version with upgraded bolts. It’s a simple case of enlarging the three holes in the retainer plate with a 5mm drill bit.
I wanted to replace the rusted jubilee clip as well but I would have destroyed the rubber filler neck in the process. (A job for another time when they’re back in stock).


Twist and push the Filler Neck into the Fuel Tank, reconnect the breather pipe and pull the rubber filler neck through the aperture.
Once you have aligned the holes you can bolt the retainer plate back into place. Job done!
My next post covers how to Replace the Fuel Lines.

Thank you so much for you informative post and the clear pictures! The breather pipes on my van are completely corroded, and I found this post through Google. You mention that you can reach through the wheel arch and push the breather pipes into the tank. Do you think I’ll be able to replace the breather pipes from the fuel tank to the expansion tank without having to remove the fuel tank?
LikeLike
Thanks Harry! Yes, i’d say that would be possible, especially if you removed a wheel first. You’d be working blind so maybe stick a camera through and take a picture so you have a mental picture of what you are doing. Warming the ends of the pipes before fitting will make it easier.
You could actually do away with the plastic pipes and just run hose from the tank to the breather tanks to simplify things.
LikeLike
Thanks James – I’ll give it a go. I was thinking of running hose the whole way. At the moment, there are just sections of rather badly corroded metal pipe.
LikeLike
Hi mate, I was wondering if a silicone lubricant on the gromits and seals would help ensure an air and petrol tight seal? Did you use anything and have you noticed any seeping of petrol if you ‘brim’ the tank?
LikeLike
I didn’t use any sealant like this, but I also just don’t brim the tank any more. I just put in an amount that I know will be a little bit under completely full..
LikeLike
Yep, +1 for the comprehensive post and the detailed photos of all the pipework laid out on the cardboard. Regarding the hard plastic breather pipes from the expansion tanks to the main fuel tank, I was just wondering where you got yours from (for the sake of originality) because I’m struggling a bit to locate them? I’ve found a supplier in Germany but I’d rather not pay £25 postage when the 4 pipes are only a fiver each. Have you found a good supplier in the UK? Thanks for taking the time to document all this maintenance work for the benefit of the wider T25 community…
LikeLike
Thanks Daniel, glad it’s of help. I just reused the originals as they were perfectly fine. I’m not sure where you could get the pipe complete with bends but you can buy lengths of 6mm Polyamide tubing from Brickwerks: https://www.brickwerks.co.uk/polyamide-tube-6×1.html
LikeLike
Hello James,
Great post! It has definitely shown me that it’s a job I can take on one of these weekends. I have one doubt and hopefully you can help me out and it is regarding the hoses that come off the expansion tanks and should go to the vapor canister. On your post you mention that they simply have “trumpets” at the ends. Does that mean that they end there? Are they sealed off? Thank you very much in advance.
Aldo
LikeLike
Hi Aldo,
Yes they are just open at the end and hang over the tank area. Weird I know!
James
LikeLike
Hi James,
Thanks for the reply. Have you ever had a problem with strong fuel smell?
Aldo
LikeLike
I used to get a strong smell when filling up before I changed the tank and connections. Now it’s much better. Are you getting a strong smell all the time?
LikeLike
Hey mate, thank you that is the answer I’ve been looking for!
Already replaced my tank some time ago but i was stingy with all the grommets and pipes… and the other day after refueling, fuel was leaking everywhere.
So I just replaced everything today with a Van Café Vanagon reseal kit but I was wondering where the kcuf were supposed to go these trumpets grommets. I was actually looking for some charcoal canister but there is none and I could’n remember of any.
So thank you!
Cheers from Switzerland!
LikeLike
Yeah, it smells all the time. I haven’t seen it personally, but my tank must have rusted out on top because on a few occasions when I have topped off with diesel it has poured out somewhere around the tank not the filler neck. This first happened around October. I doesn’t seem to leak when parked because the ground is always dry. Where could I get those “trumpet” ends?
LikeLike
Yeah it probably rusted through but could be the lines into the expansion tanks. If you search for part number “321201890” you will find the end pieces, I don’t think they’re necessary though so you could probably do without.
LikeLike
Great info as I am in the middle of this right now just need to order kit from Brickwerks. The breather pipes from top of expansion tanks, the trumpet things just hang there, not connected to anything then, is that right? I was a bit confused when I dropped the tank as I labelled all the pipes and then couldn’t see anywhere for these to go. Thanks so much.
LikeLike
Yes that’s right. They just hang there, strange I know!
LikeLike
You have shared a good info about replacing the fuel tank. It is very informative. No I can easily replace the fuel tank. Thanks for sharing.
LikeLike
Hello, congratulations and thank you for all this work, I miss the trumpets or could I find them thanks in advance
LikeLike
Have a new tank to fit,so picked up good tips by visiting this post
Beforehand 👍
LikeLike