
Modern Petrol now includes Ethanol which can eat away at old fuel lines from the inside out. I was unsure of the age of the lines in the van so decided to do a complete overhaul. A fuel leak in the engine bay could lead to a serious fire and not something I want to take any chances with.
Examples of perished fuel lines:


There are some excellent posts on the Club 80-90 Wiki I recommend reading around fuel lines in a VW T25:
Once you’ve decided to changed your fuel lines, choosing the right size and quality hose can be a bit of a minefield. However, Brickwerks explain the different types and the 100% Ethanol rated hose they supply.
UPDATE: The 100% Ethanol rated Fuel feed pipe and Fuel return pipe kits from Brickwerks are recommended.
(Although there have been no issues so far with the R9 kit used below, I’ll be upgrading to the 100% Ethanol ones when I do the job again, just to be on the safe side)
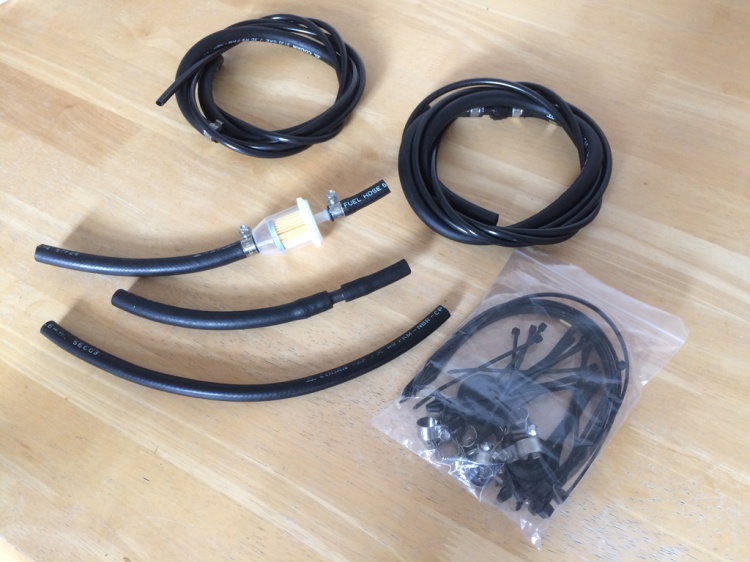
The kit fits as follows:
[Fuel Tank Outlet]
[7.3mm Hose][Fuel Filter][5.6mm Hose][Reinforcement Insert][Polyamide Pipe][Reinforcement Insert][5.6mm Hose]
[Fuel Pump]
[5.6mm Hose]
[Carburetor]
[5.6mm Hose][Reinforcement Insert][Polyamide Pipe][Reinforcement Insert][5.6mm Hose][Non-Return Valve][5.6mm Hose][8mm to 6mm Reducer][7.3mm Hose]
[Fuel Tank Inlet]
As well as the above, the kit includes grommets for the bulkhead and a variety of cable ties.
Tools needed for the job:
- Scissors
- Flathead screwdriver
- Petrol can (if draining tank)
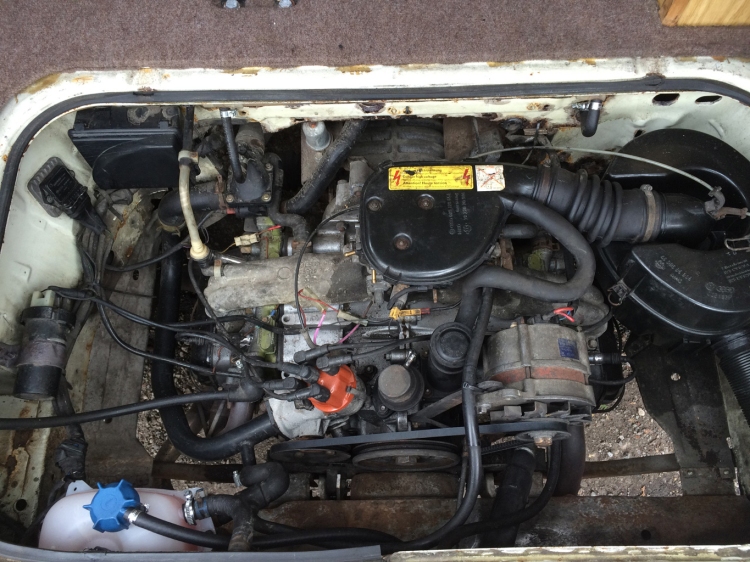
Identifying the Fuel Lines
I have marked in red the hoses which will be replaced:

The lines then run through the bulkhead, under the chassis and connect to the fuel tank. Here are some additional photos to identify the fuel lines in the engine bay:


Removal
First jack up the van and drain the fuel tank. This procedure is covered in my other post Replacing the Fuel Tank.
Once the fuel tank is empty the fuel lines connected to the tank can be cut, I snipped through the hard line with a pair of scissors. While under the van make a note of where the fuel lines go, you’ll need to channel the new ones in the same position.
On to the engine bay, unscrew the hose/jubilee clips and pull the fuel lines free of the Fuel Pump and Carburetor.

Do the same for the line from the fuel tank and finally disconnect the Fuel Pump to Carburetor. There may be some fuel left in the line but it is pretty minimal.
Fitting the new Fuel Lines
First I fitted the hose connecting Fuel Pump outlet to Carburetor inlet, I measured against the original hose and cut to size.
Next I fed the return hose hard line through the bulkhead and secured the 5.6mm hose onto the Carburetor outlet. (This section also includes a non-return valve to stop fuel going back into the Carb). Make sure the grommet is slipped over the hose before securing to the Carb, it protects the fuel line from rubbing.
Underneath the van on the Nearside I connected the pre-assembled 7.3mm/reducer/5.6mm hose section to the Fuel Tank inlet. The Polyamide hard line was fed from the the hole in the bulkhead down the same route the old fuel line had taken. I trimmed the hard line to the right length, inserted the reinforcement tube and pushed it into the 5.6mm hose before securing with a hose clip.
Finally I secured the whole return feed in place with the supplied cable ties.


Issue: The next step was to attach Fuel Feed line but I couldn’t get the 5.6mm hose onto the Fuel Pump. I took a measurement and found my Pierburg Fuel Pump has a 6mm outlet but a 8mm inlet. This meant it was impossible to fit the 5.6mm hose all the way on.
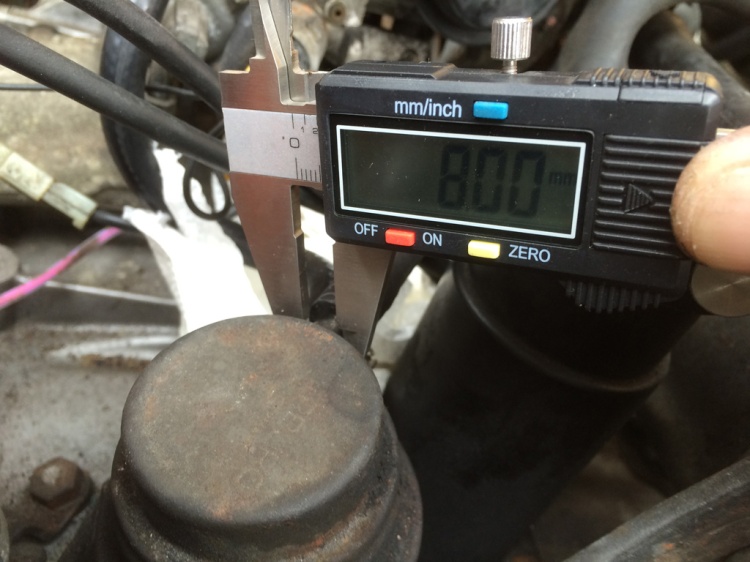
My solution was to get a short length of 7.3mm hose and a metal 8mm to 6mm reducer (had to be metal so it doesn’t melt in the engine bay).

The setup now looks like this:
[Fuel Tank Outlet]
[7.3mm Hose][Fuel Filter][5.6mm Hose][Reinforcement Insert][Polyamide Pipe][Reinforcement Insert][5.6mm Hose][8mm to 6mm Reducer *metal*][7.3mm Hose]
[Fuel Pump]
[5.6mm Hose]
[Carburetor]
[5.6mm Hose][Reinforcement Insert][Polyamide Pipe][Reinforcement Insert][5.6mm Hose][Non-Return Valve][5.6mm Hose][8mm to 6mm Reducer][7.3mm Hose]
[Fuel Tank Inlet]

Like the return feed I slid the hard line through the bulkhead with the grommet in place. Just after the engine bay the original fuel line went through a circular bracket, I fed the new line through this before it goes towards the Fuel Tank.

Just like the return feed, I cut the hard line to size, inserted the reinforcement tube and clamped in place. Job done!


The last step was to put a small amount of fuel in the tank and start the engine. No leaks and it runs fantastic!

Conclusion
If you’re thinking of doing this with your van i’d definitely recommend spending the extra on the 100% Ethanol rated hose available from Brickwerks, the components are excellent quality and come part-assembled. Also, the Stainless Steel hose clips will last forever.
Make sure to check your fuel pump inlet size beforehand as you may need an additional length of 7.3mm hose and reducer.
It was a straightforward and quick job to do. (It has taken me longer to put this blog post together). The engine now starts first time and runs much smoother. Additionally, I feel much safer knowing the fuel lines are new and I can keep an eye on their condition.

Can you get the reducer anywhere?
Great website by the way, very informative, thanks
LikeLike
Thanks Phil. You can get them from Brickwerks for £1.75: https://www.brickwerks.co.uk/fuel-line-reducer-8mm-6mm.html
LikeLike
Took off the fuel lines tank and expansion tanks with confidence after reading your site have ordered new fuel line kit, how many grommets are required for the job I,’m not sure they were routed correctly they were copper lines put on by the last owner cheers
LikeLike
Hi Nick, 2 grommets go into the top of the tank and then two that go through the bulkhead into the engine bay.
LikeLike
Hi, where do you fit the non-return valve ….CARB 5.6 hose values just outside engine bay on the other side of the bulkhead ?
LikeLike
Yep
LikeLike
Great, easy to follow, article. Just done my fuel lines, (Brickwerks kit) and fuel tank breather pipes. Same as yours 1987 1.9 DG Wasserboxer. Also needed a reducer and short length 7.3mm to connect to fuel pump. One easy tip I would recommend, I had a pack of rubber bleed nipple covers and used them to bung ends of fuel lines when feeding them through, to avoid grit ingress. Also useful when taking lines off tank to cover inlet outlet pipes. Helps with the smell of fumes ! Didn’t encounter any problems, started first go and runs like a dream 😎
LikeLike
Thanks Pete, great tips! I’ve just ordered the Brickwerks kit as this was 4 years ago. I’ll do a video this time to show the whole process. Did you drain the tank or do a quick swap over?
LikeLiked by 1 person
Hi nick,
We have replaced the fuel tank and all the pipes, no leaks but the engine now does not start. Do you know why this may be?
Thanks you so much and great post x
LikeLike
Hi Phoebe
Can you hear the starter motor going when you turn they key?
Is it a petrol engine with a Pierburg carb like mine? If so, you can take the air intake “pancake” off and pour a little amount of petrol into the venturi hole closest to you with the butterfly flap. That should give the engine enough to get going.
Hope that helps!
James
LikeLike